For those who need a little sparkle in their lives.

For the ones who contribute to art in their own way.


Monday, November 29, 2010

"Cereal Box-Purse Storage"....Wait? what???

If you're a huge shopper with little closest/storage space...I feel your pain. Buying storage boxes can get a bit pricey too. However! If you're in search of a quick storage tip, look no further than your kitchen garbage! Yeah that's right...who would of thought Cereal Boxes can actually organize purses?? They may not be the most chic/stylish way of organizing purses..but hey there's an economy crisis here people! lol

[materials]:

1 - (Doubled Bagged) Cereal Boxes. The single bagged boxes just can't cut it.
2- Three inch Scotch Tape
3- Sisccors
[steps]:
1- Cut off the top flaps of the cereal boxes. Luckily my family goes through cereal like water...so there are always boxes laying around.

2- I created my cubiles into fours. So tape every side where the boxes touch to make them hold better.

3- Stuff them in your closet and organize purses.

Easy!
[side note]: Of course you may paint them or decorate them any way you want. But I just wanted to show you all a quick storage tip. Poor bags where all shoved in there....but I had so many!
/=-P


Monday, November 22, 2010

Need a shoe uplift?

I get bored of wearing the same shoes all the time...and i can't afford new ones so...RE-DESIGN EM! Can't go wrong with jewels and glue =-)


Before:


After:

[materials]:
(1) Gem-Tac Glue
(2) Old Heels --> I got mine from Strawberries for $25
(3) An old beaded necklace.
Or if you want to buy gems from an Arts & Crafts store, it's fine too.
Steps:
GLUE beads everywhere and anywhere!
I did the same thing with pearls on this heel below.
Don't you just love dramatic shoes?
~ NEXT SHOE design....SPIKES!~


Monday, November 15, 2010

Flower -Pearl Necklace Bib

Hi Ladies!..I've become obsessed with Bib Necklaces lately. I did the one below out of sheer boredom ;-)

[materials]:
- Plastic bouquet of flowers
-Gem-Tac Glue
-Bag of Pearls
-Black Fabric
-Sisscors
-Metal Necklace Chain
[how to steps]:
  1. Pick your flower victim...(see below). [I got mine from AC Moore for $1.99. I liked the different values in the bronze color.] Any kind of plastic flower will do.
  2. Start picking that poor flower apart! Pull those individual petals out of the stem carefully. My bouquet of flowers specifically had each individual flower held toegther into 4 petals (easier to glue).
3. Cut a black piece of fabric into the shape/size you would like. Mine is sort of a fat "U" shape.
4. GLue all the petals/flowers onto your fabric. You can be as neat / messy as you want.
5. Once dry (I gave it 30 mins), glue the little pearls in the center of each flower.
6. Let it dry overnight, glue the metal necklace chain on the top back of the fabric (gem tac glue is amazing! I use it on everything / anything).
7. Let it dry completely.

Yay! Enjoy & wear =-)


Friday, November 12, 2010

DIY Bib-Necklace


Hey guys! This is my solution to all of unwanted / broken jewelry, buttons, or any random shiny piece lol.
You will need...
  • 2 sheets of black Felt Paper
  • 2 twelve inch long ribbons (I chose black for this)
  • Gem-Tac Glue ($8)
  • Scissors
  • "Broken/unwanted Jewelry" of choice

STEPS:

[1] I bought two sheets of felt paper. ( I got mine from AC Moore for 80 cents each)

[2] Cut both sheets to desired shape...I made mine really wide for a different look. lol

[3] Using Gem-Tac, glue every piece of jewelry you want to use, concentrating on one sheet of felt paper first. You might want to plan ahead of time for the placements. Have fun! Don't over think it. Don't worry about using too much glue, the more the better (it dries clear).

[4] I like to let it dry overnight.

[5]Glue about 2 inches worth on one end of each ribbon on the back of your bejeweled felt sheet. You should have a big "U" looking shape. The unglued ends of the ribbons are where you will tie it around your neck.

[6] Glue the entire back of the bejeweled felt sheet with the other felt sheet you cut in STEP 2, to cover the messiness from the glued ribbons. Let it dry overnight.

There you go...CONGRATS!
Rock out with your..*cough*...necklace out! ;-)

Tuesday, November 9, 2010

Decorating plain plastic drawers

CARD STOCK is the answer to everything...in my opinion lol. Here I bought a 3 drawer organization unit from Bed,Bath, & Beyond ($15). I just sprayed glued the front cover of each drawer and pressed on the paper of my choice.

Pretty simple, took me about 15 minutes. Enjoy! =-)


Friday, November 5, 2010

Color Creative Nails

Nail polish can get expensive...especially if you're color crazy like me. If you have a lot of unused, cheap, or worn out polishes you are no longer using.. mix em up. You'll be surpirsed at the cool and funky colors you can come up with...(and prob can't find in stores!)

I mixed a lot of beige, lil bit of dark purple, and a hint of dark blue to get the color below:

Have fun!

Chic-Cheap Magnetic Frame

I LOVE BEING CHEAP. Yes, I said it. So instead of spending $$$ on fancy frames...I printed this frame from Google on stock paper (found at any Arts & Crafts store), cut it up...glued magnets on the back...and there you go...cute and simple frame for pictures!

Earring Organization ---> "oh my!"


Hey guys!....Do you have so many earrings all jammed up together and never could figure out how to keep em nice-and-tighty? Dun dun dun duuuunn...Just wanted to share with you this cool earring organizer I made =-)

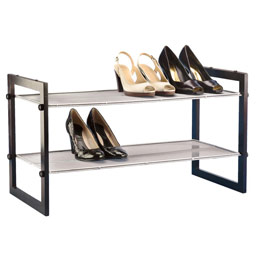
1] I had this old shoe rack, (on clearance at The Container Store) that I broke apart. I like the metal-net-like shelves it had.

2] I bought a 18x24 Black Poster Board from Staples...($2-$5 I believe?)

3] Nail the poster board to any wall of your choice.

4] Nail the metal shelves on top of the Poster Board. Any arrangement is fine.

5] Vua-la! Hang all your earrings in the little net-like holes. I pushed all my studs right into the poster board itself.

NOTE: Push the studs into an angle pointing upwards, so they don't fall out.

ENJOY GUYS!